...

How to make amazing Musical Instruments for Kids from Recycled Items found in your House

  • Team Kidmish Jun 11, 2018

Learning is always fun when music is involved. According to research, introducing music in children’s lives from early stage aid in their mental and emotional development. Parents of young kids are always on the lookout for ways to keep their overly active children engaged. Musical instruments act as brilliant distractions for kids and the best part is that you can recreate many of these musical toys at home. It is incredible how much you can produce with recyclable materials and a tad bit of creativity.

Following are six musical instruments for kids that you can make at home with your children.
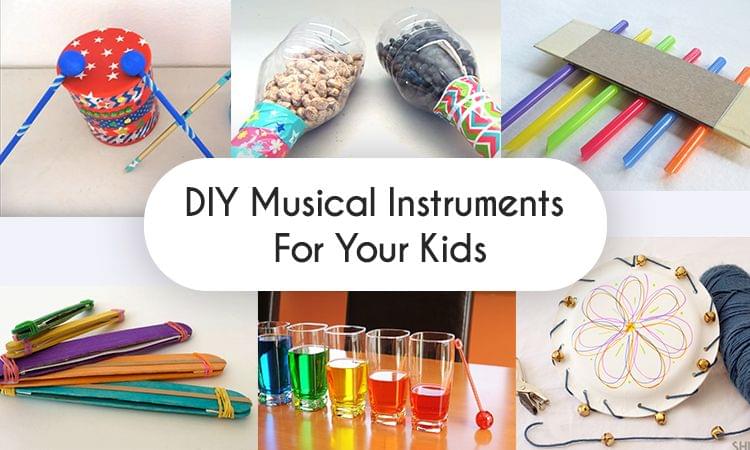
  • Drums

Drums are percussion instruments that are played with drumsticks. The same can be recreated at home using recyclable items like an empty tin can, balloon, chopsticks, etc. Follow the instructions given below to create your own DIY musical instrument for kids of any age. Kids are always hyperactive and restless, so it becomes a great way to channel their energy towards creativity. As kids love the coloring and decorating, the same can be done by them under your guidance. Make use of bright colors and attractive designs to decorate the drums as they look very appealing to the eye and your child will find it hard to resist playing them.

Things Required

The Instructions

Small tin can – 1

Balloon large – 1

Decorative tape – 3

Chopstick – 1

Cutter

Chart paper – 7”x7”

Decorative gems and stars

Wooden oval heads for drumstick - 2

  • Remove the lid of the tin can.
  • Cut the stem of the balloon and discard the bottom half. Use the top part of the balloon to cover the tin can.
  • The balloon should stretch across the length of the can and cover the edge of the base.
  • Place the tin over a coloured chart paper and draw the circumference of the bottom. Cut the circle with the help of scissors and paste it into the base of the tin can.
  • You can make use of decorative tape, gems, and stars to decorate the tin can which acts as a drum.

For drumsticks:

  • Take a chopstick and cut it in half using a cutter.
  • Take two wooden oval head and stick it to the ends of each chopstick using wood glue or a hot glue gun.
  • Now decorate the drumsticks by painting it a complementary colour and or by adding decorative tape to the sticks.  


  • Maracas

Maracas are rattling instruments that find primary use in the Caribbean and Latin music. These little shaking instruments are perfect companions for toddlers as they are always looking to hold onto stuff. Maracas are one of the easiest musical toys to recreate, and your kid is bound to be fascinated by it. Homemade items like beans, a bottle, and some decorative tape can whip out a fun instrument that engages their fancy. It also gives your child an opportunity to gain exposure to different things. It is simple to use, and you can make multiple maracas in the least amount of time which comes in handy for parents with more than one child.   

Things Required

The Instructions

  • Small size plastic bottle – 1
  • Beans – handful
  • Soft cardboard – 7” x 3”
  • Decorative tape – 3
  • Scissors
  • Add the beans in the plastic bottle till it is half full to create a rattling sound when shaken. Close the lid.
  • You can make use of the cardboard roll of an empty toilet paper roll. Cut it along the length and flatten it out.
  • Tape the cardboard to the top cover of the plastic bottle using decorative tape so that it forms a stick. Use two layers of tape to secure it in place.
  • You can decorate the cardboard stick with alternate tapes to make it more appealing to the eye.
  • The maracas are ready with a top that makes a rattling sound and a stick to hold the instrument in hand.

  • Water Xylophone

Water xylophone is a musical instrument for kids that can be made anytime instantly by them. All you will need is around 8 glasses filled with decreasing levels of water and wooden (or metallic) spoons to produce sweet sounds. Add a different colouring agent to each glass to increase its visual appeal. And Voila! You have made your very own water xylophone. Kids can try to play a variety of musical notes as each glass (with a different level of water) produces a unique sound. Your kid is sure to enjoy playing their favourite songs, and you can witness their sense of exhilaration at hitting the right notes.

Things Required

The Instructions

  • Normal-size water glasses - 8
  • Water
  • Colouring agents – 3 or 4 different colours
  • Wooden or metallic large spoons - 2
  • Place all the 8 glasses in a straight line on a table surface.
  • Start filling the first glass with water up to the brim.
  • Continue adding water to the other glasses but make sure that each glass has less water than the glass before it.
  • In this way, the 8 glasses are arranged with decreasing levels of water with the first glass being completely full and the last glass being completely empty.
  • You can add various colouring agents to different glasses as the pop of colour will increase its visual appeal.
  • Make use of the spoons to strike the side of the glasses. As each glass is filled with a different level of water, every glass will produce a unique sound.
  • You can play a song by striking different glasses to produce different notes.

  • Tambourine

Although it looks complicated, making tambourine instruments at home is a child’s play. Children can make these percussion instruments all by themselves with parental supervision. You can turn generic items like paper plates, which you findcomfortablyat home, into something playful and entertaining. It is fun to create something so easy, and you are sure to have a gala time with your child. When kids partake in making such instruments, it develops their motor skills, and they tend to become more efficient in cognitive thinking. To make these musical instruments for kids more appealing, you can task your child with painting and designing the paper plates to suit their fancy.  

Things Required

The Instructions

  • Paper plates – 2
  • Yarn
  • Hole Puncher
  • Jingle bells – 6
  • Beans - handful
  • Cut about 3 inches of yarn into a section and make 12 such sections.
  • Take a paper plate and fill it with a handful of beans. Cover it up with the other plate and use a hole puncher to punch holes across the edge of the plates.
  • Punch 12 holes in total at equidistance from each other like the hours of a clock.
  • Take 6 jingle bells and tie it with the yarn at alternate ends of the plate. Tie the remaining holes only with the yarn and not using the jingle bells
  • You can get creative and decorate the base of the plates on both sides using artistic designs and appealing colours.

  • Harmonica

A harmonica or mouth organ can be replicated using Popsicle sticks/ tongue depressors. Follow the instructions given below to create this musical instrument for kids with ease. You can involve your child in this fun project as it will help both of you bond and share some quality time together. Children love participating in artistic things and creating such creative instruments lays the foundation for their artistic abilities in the future. Additionally, your kids will have the best time making different sounds out of this simple musical toy.

Things Required

The Instructions

Tongue depressors – 2

Rubber bands – 1 (thick) and 2 (thin)

Chart paper 2”x 2” – 2 pieces

Tape

  • Take one tongue depressor and tie a thick rubber band along its length.
  • Take the chart paper cut in the given measurement and fold it three times. Repeat the same with the other chart paper.
  • Use two small pieces of tape and roll each of them outwards so that it is sticky on all sides.
  • Use the tape to glue the chart papers to the unused tongue depressor at both the ends leaving some space at the edge.
  • Now place the first tongue depressor on top of the taped one, holding it together with thin rubber bands.
  • Twist the rubber bands a couple of times to place it tightly on top of where the chart paper lies.
  • You cancolorthe tongue depressors to make it look more vibrant.
  • By placing it in your mouth and blowing air in and out, you can create amazing sounds just like with a harmonica.


Variations:

  • Instead of tongue depressors, use can also use Popsicle sticks.

  • Flute

By merely using drinking straws, you can create your very own flute! Parents and children can work together on making this particular musical instrument for kids as it involves a few mechanics. Nevertheless, your child will enjoy the end result and will spend long hours perfecting the sound. It will undoubtedly become their new obsession, and it will be a refreshing change compared to their regular toys. It may look like a simple instrument, but it is a crucial equipment that enhances their skills and aids in the overall development of your child. Be rest assured, your kids will make the most out of their musical toy as every child is a perfectionist in their own right.

Things Required

The Instructions

Straws – 8

Lighter or candle

Duct tape

Scissors

Pliers

  • Take a straw, hold it with a plier and seal one end with a lighter. Ensure that the air cannot pass through the closed end by blowing into the straw.
  • Repeat this step with the other straws.
  • Cut one straw a few cms at the open end and check for the sound produced by replicating the lip movements while playing the flute. Ensure that you are holding the straw perpendicular to your lips.
  • Similarly, cut the next straw a few inches shorter than the first one and check for the sound produced.
  • If you are not happy with the sound it is making; you can take off a few more inches of the straw from the open end.  
  • Eventually, you should have 8 straws forming a straight line at the top and in the descending order at the bottom.
  • The sound produced too should be in a sequence.
  • Take about 7 small straws having a length of about 4 cms and add one between two original straws. These short straws should be placed alternately between the original ones.
  • Now duct tape all the straws together securing at both the sides.
  • When you play the straw flute, it should produce sounds in a sequence due to the decreasing order of the straws.

  • Rainstick

Rainsticks can be made with discarded items found in homes, and the instrument works on a very simple principle. Young kids will surely find it amusing as legend has it that this musical instrument was used to bring about rainstorms. You can engage your kids in the backstory, and they will be even more enamoured by their latest musical toy.  

Things Required

The Instructions

  • Hollow cardboard tube – 1
  • Aluminium foil – 1 large sheet
  • Uncooked rice –handful
  • Craft paper
  • Scissors
  • Colour to paint
  • Thick rubber bands – 2
  • Decorative items of your choice


  • Take a hollow cardboard tube of medium length. If you have a longer tube, you can cut it in the size that you want for your rainstick.
  • Paint the tube witha colourof your choice.
  • Now place the circumference of the tube on the craft paper. You have to trace 2 circles that are wider in diameter, roughly about twice the circumference. You can use your judgment for this as it does not have to be accurate.
  • Now cover one end of the tube with the craft paper using a thick elastic rubber band.
  • To add a filtering agent, you can use aluminium foil twice the length of the tube. Crumple it up and twist the foil for a rough appearance. Fold the foil into half so that it is the same length as the tube.
  • You can insert the crumpled aluminium foil into the tube.
  • Now take a handful of rice, which will produce the rain sounds, and pour it into the hollow tube.
  • Seal the open end with the craft paper as mentioned above.
  • To make it more attractive, you can cover the rain stick with butterflies, sequins, and heart decorations.
  • You can also tie colourful ribbons at the edges marked with rubber bands.

Variations:

  • For the hollow tube, there are several options like the cardboard tube of paper towel holders, toilet paper roll, or wrapping paper. You can also use a hollow wooden tube.
  • Aluminium foil can be replaced with chicken wire, nails, straight pins or toothpicks.
  • For uncooked rice, the alternatives are black beans, lentils, bird seeds, and pebbles.

Conclusion:

We would encourage our readers to try out these simple DIY musical toys that can be made at home and share their feedback in the comments section. Such musical instruments for kids engage their creative sides while making them more interactive and attuned to their surroundings. As a parent, what more can you ask for?

Until then, Happy Parenting!


Enrich Kidmish with Your Comments